
Enhance Audio on iPhone Video: Default & External Method
iPhone, among the leading smartphones in the world, is known for its innovative attention to detail, functions, and features. Out of all of these, the quality of their camera stands out, as it captures smooth yet high-quality images and video footage. As one of iPhone's main selling points is its camera quality, some invested in using such a device to capture precious and quality moments, as if they were taken fresh out of the user's POV.
However, there has been a struggle in fully utilizing it, as some users are having problems with the poor-sounding audio quality of their iPhone video. While this presents a problem in capturing and preserving a quality moment, you don’t want that to happen, and running your video taking right? As such, reading this article will help you gain valuable insights and tips to avoid encountering such problems, improve audio on iPhone video through default means and use third-party tools, as well as resolve the low-quality sound of your iPhone video through a step-by-step process.
Contents:
Part 1. Check Audio Conditions on iPhone
When an iOS user is having a problem with their iPhone’s video audio quality, it is just right to check the audio conditions of your iPhone. This involves observing how you handle your device when recording a video, checking the internal factors that affect the quality of your audio with your iPhone video recording, and examining your device's microphone. To begin checking your audio conditions, you may check our listed tips to help you understand your iPhone audio conditions.
1. Check Your iPhone Microphone.
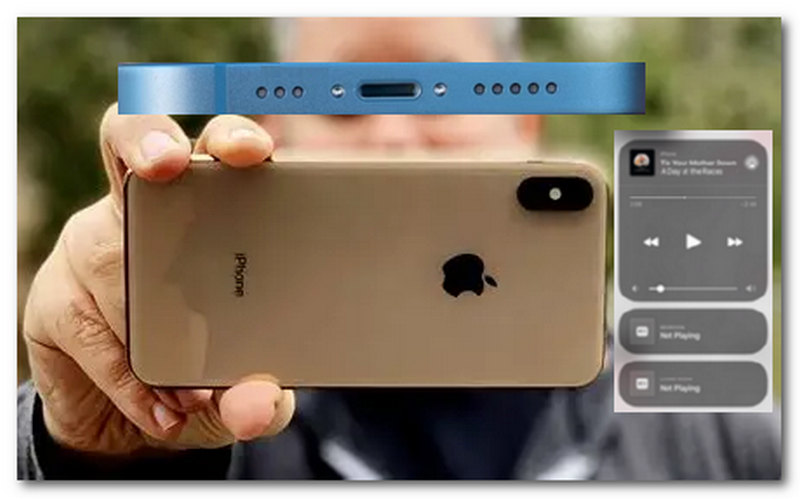
Checking your iPhone microphone is a must before recording. You may do this by checking your iPhone’s microphone vent. If things or dirt are covering it, you can avoid recording low-quality audio in your videos.
2. Clean Your iPhone Microphone Vents.
Cleaning your microphone vents from time to time can help eliminate the buildup of dirt, which can cause poor audio quality. You may use cotton buds to remove the dirt from your microphone vent.
3. Holding Your iPhone Properly When Recording.
When holding your iPhone to record a video, be sure to practice and position your hands so that they do not cover your microphone vents. You may do this by not covering the area of your iPhone's charging port, as a microphone port is located there.
4. Check Any Running Background Apps.
Aside from the external factor of hand placements and checking your iPhone's microphone vents, there is an internal factor that can cause poor audio quality in your video. This is because you should stop any running apps or services on your device before hitting the record button. Specifically, pausing your music playing on your iPhone is what you should do first before recording a video.
Part 2. Use iPhone Built-In Feature
Audio Mix is a new feature available on the iPhone 16 lineup. This built-in feature in the iPhone camera allows users to have various sound profiles for their video recordings that they can customize to improve the video’s audio quality after the recording.
Audio Mix Modes
• Standard Mode is the default audio quality of the recorded video.
• In-Frame Mode is a mode that will focus the audio on the visible subject in the video.
• Studio Mode is a mode that helps reduce background noise in recorded videos and enhances vocals for a more precise sound result.
• Cinematic Mode is a mode that emphasizes the surrounding noise, creating a cinematic feel.
Steps to Use and Access Audio Mix on iPhone 16
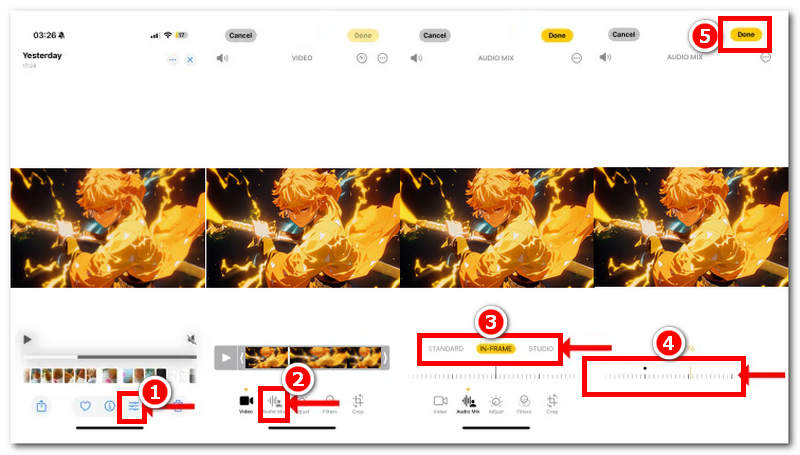
Step 1. Go to your Photos app, and open a video you wish to adjust the Audio Mix setting with by tapping on the Edit button of the video.
Step 2. Next, tap on the Audio Mix feature from your Edit section.
Step 3. Select your preferred Audio Mix Mode.
Step 4. Adjust the intensity of your chosen Audio Mix, and once satisfied with it, tap on the Done button to save the changes.
Part 3. Use the External Audio Recording Tool
If a built-in feature, such as the Audio Mix feature, is not available on your iPhone, there are still ways to enhance the audio on your video. That is the usage of an external microphone and windscreen on your iPhone.
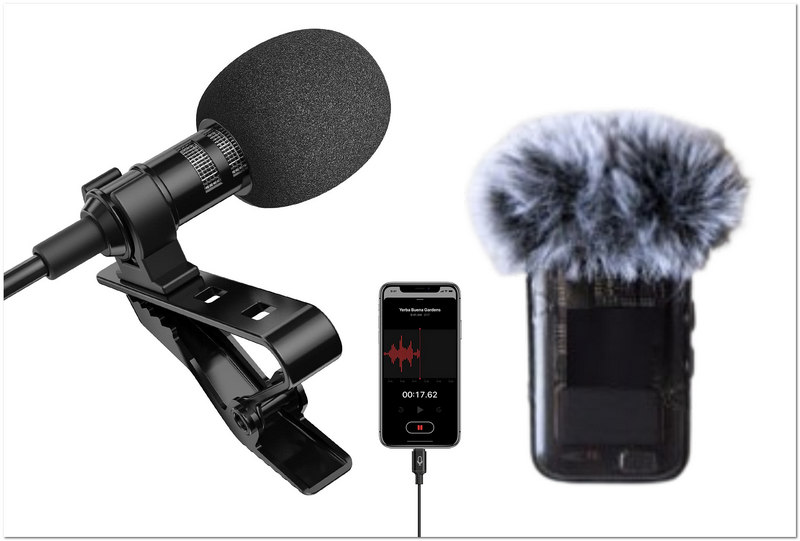
By having an External Microphone, this will allow your iPhone video recording to have clearer and less background noise footage, as using such tools is the sole purpose of eliminating background noises, which helps the vocals or those close to the microphone to be heard loud and crisp.
Wind Screen is an extension tool for iPhone devices, acting as a physical wind barrier on the mic, which helps eliminate or lessen wind noise from the microphone that can cause inaudible vocals in a video.
Part 4. Bonus: How to Enhance Video With Good Audio Conditions
Finally, if you are having problems with the quality of your iPhone videos, then this section will help you resolve the issue. As iPhone's camera prowess is one of its smartphone's strengths in capturing photos and images, poor video quality in your iPhone is unforgivable. But worry no more, as there is a method you can use to address the low quality of your iPhone videos using a third-party tool called Video Enhancer.
VidHex Video Upscaler is a perfect tool for enhancing the color quality of your low-resolution iPhone videos. You can even use it as an anime upscaler. As a lightweight software tool for Mac and Windows devices, its sole function is to fix and improve. Thus, you can be guaranteed that the tool will not affect your videos’ audio, so you can focus on recovering the missing video quality without compromising the audio quality.

Key Features
• AI-powered video upscaler tool.
• Lossless audio output quality.
• It can batch process multiple low-resolution videos to upscale in one go.
• iPhone video upscaling capability up to 4K resolution.
• It has a wide array of AI models to restore video footage.
• It has a very straightforward and simplistic user interface.
• Easily enhances and adjusts video sharpness by removing blurriness.
• Maintain original video elements.
• Equipped with faster processing hardware, export speed is increased.
• Gives a smoother video and a natural-looking result.
• No watermark is seen when your video has successfully upscaled.
Steps in Using VidHex
Step 1. Download and install the VidHex Video Upscaler software on your desktop device.
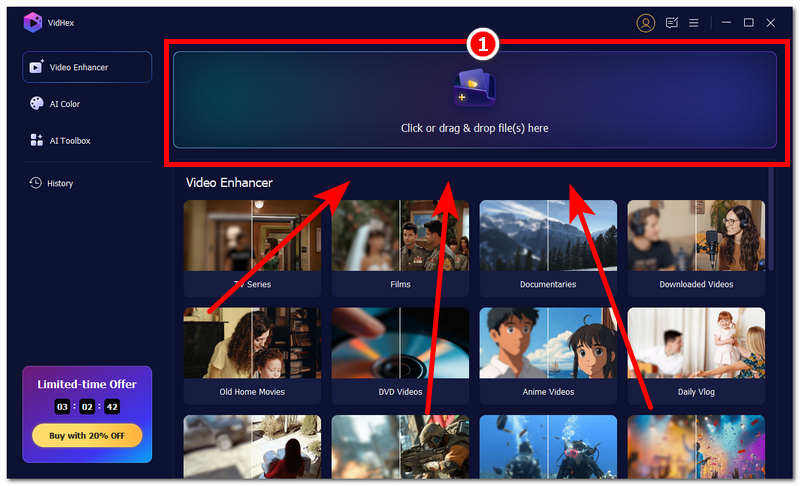
Step 3. Once done, choose an AI model located on the right side of the VidHex Video Upscaler interface for enhancement, such as the General Enhancement Model.
Note: You can also select the clarity and magnification effect in the Output Resolution.
Step 4. Once you have your AI model selected that you think best fits your iPhone video concern, proceed to click on the Export button.

See, easy and simple, it can help you improve video quality and help you obtain a better viewer experience. Don’t hesitate to give it a try!
Prefer a visual walkthrough? Watch the video below for more details.
Part 5. FAQs about Enhancing Audio on iPhone Video
Does enhancing iPhone videos’ audio work?
It depends on the video quality problems and their severity. But the majority of iPhone videos’ audio quality problems are minor. Thus, making it fixable by performing a default troubleshooting on the iPhone devices and using third-party tools.
Does enhancing audio quality affect iPhone video quality?
No, enhancing audio may only resolve audio quality concerns. However, using tools or methods unknowingly and recklessly may result in damaging your video quality. Therefore, make sure you are fully aware of what you are doing to avoid causing problems with other parts of your audio or video.
When should I use a video audio enhancer?
You may use a video enhancer tool when you can no longer resolve your iPhone video audio quality through a default method, when the audio quality is too muffled, when there is too much background noise in the video, and when you want your video to sound professional and well-sounding.
Conclusion
Improving iPhone’s video sound quality can be done by checking the physical condition of your iPhone's microphone vents, cleaning them, and ensuring that while recording, you are not covering them. Moreover, the latest iPhone model features a feature that allows users to choose Audio Mix, which will enable them to easily enhance their video sound without the use of a third-party tool. In addition, while it is incredibly functional for a seamless and hassle-free audio enhancement of video for iO, it is only available on the iPhone 16.
As this guide has listed all the possible things you can do to ensure a high-quality iPhone video sound, the most ideal and essential factor to prevent suchproblemsfrom m occuring to you is to invest in using of external iPhone audio extension tools such as microphone and windscreen as this can significantly reduce background noise and helps the audio more professionally sounded with a minimal need for enhancing it.

- Upscale videos to 4K/8K with AI.
- Increase FPS for smoother videos.
- Colorize B&W old recordings.
- Brighten the low-lit footage.
- Remove noise with details retained.


