
How to Enhance Video Quality: Tested Tips and Steps

In today’s digital era, millions of videos are uploaded daily across various platforms, and the quality of your video can significantly impact viewer engagement and the effectiveness of your message. Poor video quality can lead to viewer disengagement, whereas high-quality videos can enhance your credibility and increase your audience reach. Hence, this article aims to expand on the necessity of improving video quality and the elements affecting video quality, and provide comprehensive guidance on how to enhance video quality during the recording and editing phase. By implementing these techniques, you can enhance video quality and create content that engages your audience.
Contents:
Part 1. The Necessity of Enhancing Video Quality?
The significance of improving video quality lies in three aspects. Firstly, it can enhance the viewing experience, making your content more enjoyable to a wider audience. High-quality videos with clear visuals and crisp audio can capture and retain audience attention. Secondly, quality enhancement can help your content stand out in a crowded digital world. With so many videos competing for viewers’ time and concentration, those with superior quality are more likely to be noticed, shared, and remembered. Additionally, enhancing video quality can increase the professionalism and credibility of your work. High-quality videos can build trust with your audience because they can demonstrate that you value both your content and your viewers, which can lead to increased engagement, loyalty, and even conversions.
Part 2. Key Factors Affecting Video Quality
Before exploring methods to improve video quality, it’s essential first to understand the common factors contributing to poor results. Once the root causes are identified early on, you can take proactive steps to prevent quality issues from occurring in the first place. These elements often determine the quality of videos:
Resolution
Resolution is the number of pixels displayed in each dimension of a video frame. Higher resolutions (like 1080p or 4K) contain more pixels, producing sharper and more detailed images. On the contrary, lower resolutions (like 720p or below) may appear blurry or pixelated, especially on larger screens. Choosing the appropriate resolution depends on your intended platform and audience.
Bitrate
Bitrate is the amount of data processed per second in a video file. A higher bitrate generally stands for better video quality, as more data is used to represent the video’s visual information. Nevertheless, higher bitrates also bring about larger file sizes, which can impact storage and streaming performance. Therefore, it’s essential to balance the bitrate. After all, videos with a low bitrate may appear blocky or blurry, while videos with a higher bitrate are likely to cause buffering or slow loading times.
Frame Rate
Frame rate, measured in frames per second (fps), determines how smoothly motion is portrayed in a video. A higher frame rate can make motion appear more fluid, but it requires more processing power and storage. Conversely, a lower frame rate needs less storage space, but it can blur fast movements. In this regard, selecting the right frame rate depends on the type of content and the desired aesthetic.
Lighting
Lighting can also play a vital role in video quality. Inadequate lighting can bring about grainy or dark footage, while harsh lighting may lead to overexposure or unflattering shadows. Natural light is ideal, but when unavailable, softbox lights, ring lights, or three-point lighting setups can help achieve balanced illumination. Proper lighting enhances clarity, color accuracy, and overall visual appeal.
Part 3. Increase Video Quality Via AI Video Enhancer
AI-powered video enhancers have revolutionized post-production by automating complex enhancements. Tools like VidHex Video Enhancer leverage the updated artificial intelligence to upscale resolution, reduce noise, sharpen blurry footage, and even interpolate frames for smoother motion. This tool is particularly effective for restoring old or low-resolution videos, as it analyzes each frame to restore lost details. For instance, this tool can automatically detect and correct grainy textures due to poor lighting, as well as enhance facial features in low-quality clips. It remarkable advantage is speed, which used to take hours of manual adjustment, can now be achieved with a few clicks.
VidHex is a cutting-edge video enhancer empowered by AI technology. It can help you unblur, upscale, stabilize, denoise, and colorize your videos, as well as insert frames to make them look smooth. Here are the details about its functions:
• 4K upscaling enhancement and enlargement.
• Enhance and fix grainy videos with diverse AI models.
• Reduce video noise and remove pixelation.
Step 1. Download and install VidHex on your computer. Once the program is open, you’ll see various enhancement tools, including Video Enhancer, B&W Colorization, Color Enhancement, Video Denoise, and Frame Interpolation. To improve resolution and overall quality, you can initiate by selecting the Video Enhancer tool.

Step 2. Import the video you want to enhance by hitting the Click or drag & drop files(s) here Button or directly dragging the video into it.
Step 3. VidHex’s AI models can cater to different video types, including Face model, Anime Model, Colorize Model, and more. You can choose the AI model you would like to use to realize different goals. For example, for simple enhancement, you can choose the General Enhancement Model.

Step 4. Tap the Preview button to review the results. Moreover, you can compare the enhanced version with the original in full-screen or side-by-side comparison mode to have a better view of the improvements.

Besides, you can adjust the output settings on the last page. Click the gear icon next to the Export All button, here to set output resolution, bitrate, encoder, and format.
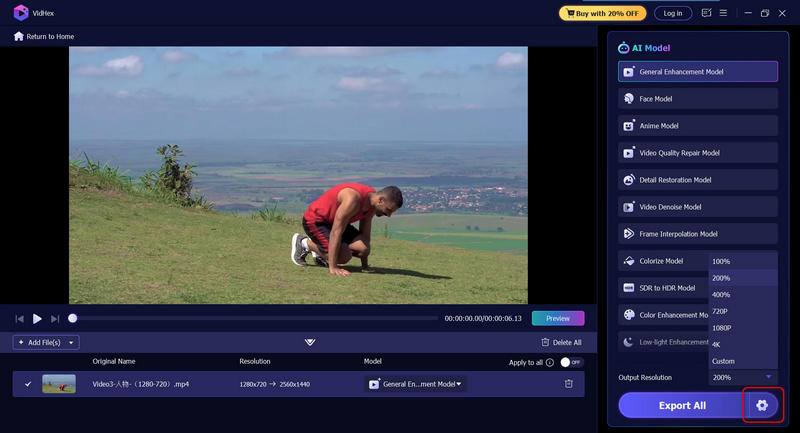
Step 5. If your expectations for quality are met, click Export All to save the enhanced video to your device.

Prefer a visual walkthrough? Watch the video below for more details.
Part 4. Methods for Video Quality Improvement while Recording
Although great significance should be attached to editing to enhance video quality, starting with high-quality raw footage is essential. The recording phase lays the foundation for your final product, and making the right choices during this stage can save time and effort later. Key methods to improve video quality during recording are as follows:
Method 1. Choose Suitable Equipment
To capture high-quality video, it all starts with choosing the appropriate camera and accessories. Specifically, you can use a camera that supports at least 1080p resolution, or 4K if your setup allows it. Moreover, a clean, high-quality lens also makes a big difference in image clarity and depth of field, so always remember to wipe it before shooting. Additionally, consider using tripods, gimbals, or stabilizers to minimize shaky footage, thus making your video look professional and attractive.
Method 2. Optimize Lighting Conditions
Lighting is another crucial factor. Proper lighting is of great significance to clear and visually appealing videos. If possible, use natural light, as it works best. To achieve this, position your subject in front of a window or shoot during the golden hour for soft, flattering light. If you’re shooting indoors or in low light, consider using softbox lights, ring lights, or a three-point lighting setup to eliminate harsh shadows and create a balanced, polished look. But remember that never mix different types of lighting, as it can result in color inconsistencies.
Method 3. Adjust Camera Settings Properly
Camera settings also play a major role. To record high-quality videos, set your resolution and frame rate based on your content (eg, 24fps for a cinematic feel, 60fps for smooth motion). Furthermore, adjust exposure, white balance, and focus manually to maintain consistency and avoid common issues like overexposure or color shifts. These adjustments can significantly improve the final result.
Method 4. Capture High-Quality Audio
The quality of Audio can also impact the quality of video you shoot. Therefore, use external microphones, such as shotgun, lavalier, or condenser mics, instead of relying on built-in camera mics for better sound. Additionally, always monitor audio levels with headphones during recording to prevent distortion or overly quiet sound. Moreover, record in a quiet space and use soundproofing materials if needed to reduce background noise.
Part 5. FAQs about Enhancing Video Quality
How to improve video quality through HitPaw?
Simply upload your video to HitPaw Video Enhancer, choose a suitable AI model, and let the tool automatically upscale resolution, reduce noise, and sharpen details for better clarity.
Can ChatGPT enhance video quality?
No, ChatGPT cannot directly enhance video quality because it’s a text-based AI, but it can guide you through the process or recommend tools and techniques to help improve your video.
How to convert a normal video into high quality?
You can achieve this by adjusting the resolution, bitrate, and frame rate, and utilizing a professional AI video enhancer that offers color correction, noise reduction, and AI enhancement.
Conclusion
For many video creators, improving video quality is essential to creating engaging and professional content. To this end, you can take measures during the recording phase or the editing phase. During the recording phase, prioritize key factors to optimize quality. During the editing phase, you can turn to AI enhancers and editing software. Bear these methods in mind, and you can produce clearer, sharper, and more visually appealing videos.

- Upscale videos to 4K/8K with AI.
- Increase FPS for smoother videos.
- Colorize B&W old recordings.
- Brighten the low-lit footage.
- Remove noise with details retained.


